If you are having difficulty getting TrackIR to work with X-Camera verify that you have done these steps:
- Start the TrackIR software before you start X-Plane
- Make sure you have done a games update and that X-Camera is showing up in the TrackIR game titles list
- Make sure that TrackIR is shut off in the X-Plane hardware options. X-Plane and TrackIR can not both be attached to the TrackIR interface at the same time. If you did need to shut trackIR off in X-Plane you may need to restart X-Plane once to get it to release the TrackIR interface
- Make sure that you have enabled TrackIR on the cameras you want it on. Remember that one of the advantages of using X-Camera is you can control what input options like TrackIR and HeadShake you want on each camera.
Some aircraft designers look at the X-Plane view type to determine how much to render. As an example some of the Flight Factor planes will not render the exterior properly if you simply place a 3D cockpit camera out side the plane.
X-Camera has a camera option called "External Camera". This option uses the X-Plane free camera view which will allow the correct rendering of the plane's fuselage. Open the Control Panel and check the "External Camera" option for any external views.
When X-Camera is enabled it takes over exclusive control of the horizontal field of view. If you need to change the X-Plane default field of view make sure you disable X-Camera first before making the adjustment on the X-Plane graphics options page.
Yes. The latest version of the tobii X-Plane plugin has a native integration to X-Camera. Read More...
Check to make sure you did not change the X-Camera folder name in the X-Plane plugins directory. It needs to remain named X-Camera and you can not have two versions of X-Camera installed in the plugins directory at the same time. X-Plane 11 is very fussy about the plugin folder name matching the XPL file name under the win_x64, mac_x64, and lin_x64 folders.
The latest version of X-Camera only supports X-Plane 11.3 and higher. However, when you download X-Camera the older version, 2.3.3, is included in this archive. Version 2.3.3 still runs on X-Plane 9 and 10. Support for X-Camera 2.3.3 is limited to just bug fixes.
When you are running the simulator across multiple monitors and you are on X-Camera 2.4 your MAIN (primary) monitor must be one of the monitors in the set. X-Camera displays the mini-control on the main monitor. If the main monitor is not one of monitors in the configuration then you will not see the mini-control panel.
This has been improved in X-Camera 2.4.1.
It is best to save and backup your license email or serial number to a safe place.
If you purchased your product from the X-Plane.org store all you need to do is log in to your store account and go to the download section for that product. Your serial number is displayed there.
If you purchased your product from the Stick and Rudder Studios website or from our product listings directly on Gumroad then you would have received your key via an email. If you do need to get the email sent to you again, you can just use the contact us form to let us know you need a replacement. Please allow us a day to respond to your request.
The best way to stay informed about product updates is to subscribe to your newsletter. Visit the Mailing List page to subscribe now.
X-Camera uses the concept of View IDs to mark a camera as a favorite and to make it available to X-Plane's key/joystick button to command mapping capability. A camera can be assigned a view ID number between 1 and 25 essentially giving you 25 favorite cameras. When in the X-Camera control panel simply assign a number between 1 and 25 and put it in the View ID field on the camera.
Once you have assigned unique numbers to each of your favorite cameras you can then go into X-Plane's keyboard and/or joystick settings and map your keys or buttons to the X-Camera commands "SRS/X-Camera/Select_View_ID_1" through "SRS/X-Camera/Select_View_ID_25".
Please have a look at the first tutorial video to see how it is done
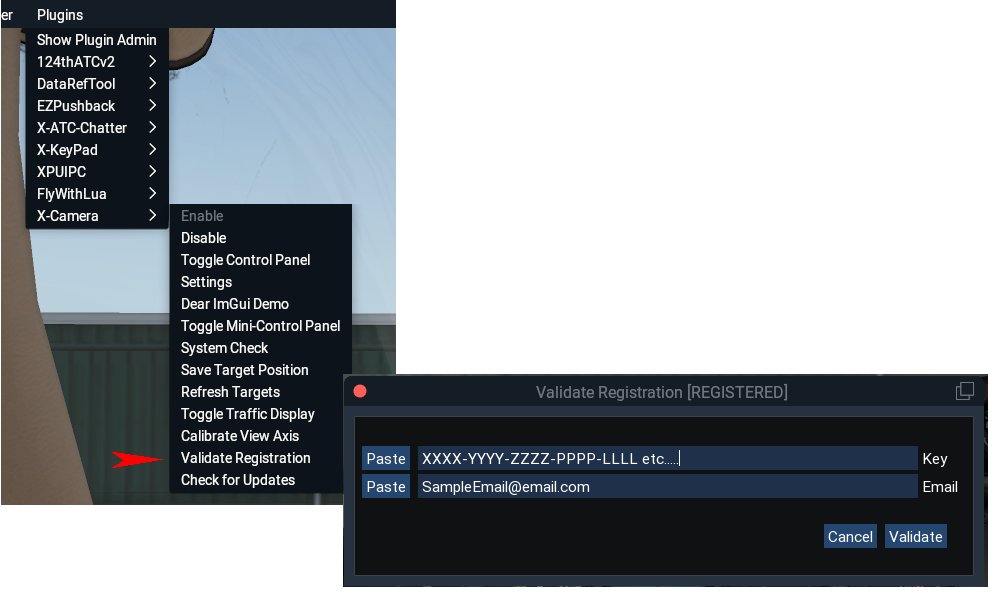
If you bought X-Camera from the X-Plane.org store the key (serial number) will be shown on your order. If you bought X-Camera on the Stick and Rudder Studios website the key is sent to you by email. In both these case you would use the X-Plane plugins/X-Camera/Validate Registration menu item to open the validation dialog where you would enter your key and the email you used when you bought it.
Purchases Prior to 2022
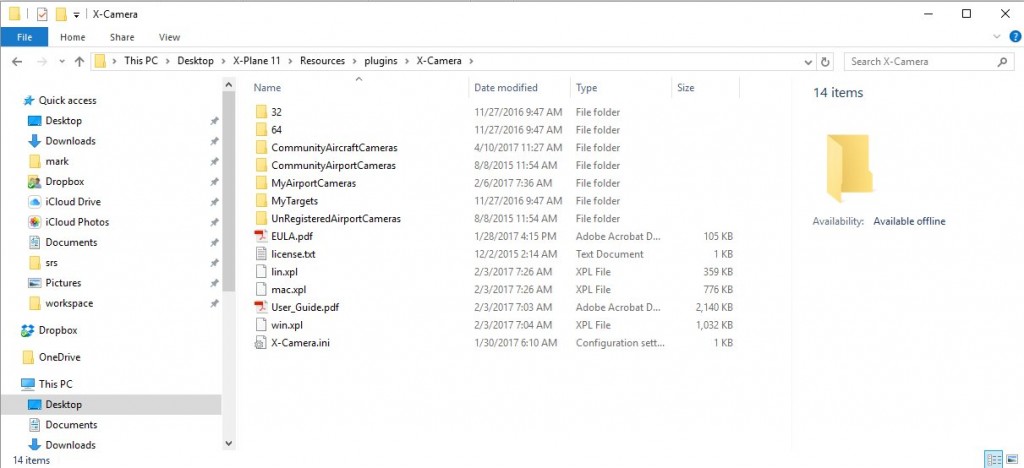
If you had purchased your key on the Stick and Rudder Studios website prior to 2022 the email would have contained an attachment. The attachment is named "license.txt" and is a simple text file that contains your key on line 1 and your email address on line 2. When the X-Camera plugin loads at startup it will look for this file in the X-Camera folder. It looks for the file under the name of license.txt. The name is critical and it must be all lower case if you are on OSX and Linux. The following image is an example of the contents of the X-Camera directory.
After saving the email attachment to the X-Camera directory you will need to restart X-Plane if you saved it while X-Plane was running. If X-Camera does not show as registered in the Control Panel title bar please check the following:
- Make sure you save the file to the X-Camera directory, example, X-Plane 11\Resources\plugins\X-Camera\license.txt.
- Make sure the file is named exactly license.txt and not something like license(1).txt. It should be all lower case.
- Make sure you saved it to the active X-Plane tree. Many people have multiple copies of X-Plane on their systems.
- If you saved it while X-Plane was running you will need to restart X-Plane so the X-Camera plugin is reloaded.
- Look in the X-Plane log.txt file for any X-Camera messages and if there is anything about the license.txt file that might give a hint as to what is wrong.
If you happen to see an X-Camera message in the log.txt that states:
X-Camera: License key is not properly signed
This is an indication that your email client may have wrapped the key onto a 2nd line when the license.txt attachment was saved to the X-Camera directory. The contents of license.txt file should look like this:
183-2908-0678-1A70-077C-0B71-786A-1961-0673-1D79-5599-0065-046E-4420-0D35-4B4F-4632-793D-4C33-0F20-4562-0633
me@myemailserver.com
Edit the licence.txt file using your operating system's text editor and if the key has been wrapped onto two lines remove the extra newline so that your key is on line one and your email address is on line two. Be careful not two remove any characters in the key. Also make sure that there is a blank line after your email. Some email clients have been know to remove the blank line following your email which can cause X-Camera to see the key as improperly signed. Once you have corrected any errors save the file.

